Fisher & Paykel myAIRVO 2 Humidifier System
In Stock


- Prescription Required
- 2 Year Warranty
- Adjustable temperature and flow settings.
- Three temperature settings (37, 34, 31 °C) help achieve comfort and compliance.
- Integrated flow generator delivers a wide flow range of 2 - 60 L/min.
- *No wall air supply required*

Prescription required
Introducing the F&P myAIRVO™ 2 humidifier with integrated flow generator, delivering respiratory support and airway hydration with a focus on comfort and ease of use.
Fisher & Paykel myAIRVO 2 has an integrated flow source in the humidifier providing air or oxygen mixtures at high flows to patients up to 60 L/min via different interfaces. The variety of AIRVO 2 accessories provide comfort, adaptability, and portability to its users.
Fisher & Paykel myAIRVO 2 Humidifier Overview
The Fisher & Paykel myAIRVO 2 Humidifier System is designed to supply respiratory support and airway hydration focusing on easy accessibility and comfort. The design highlights Optiflow, the ability to deliver nasal high flow. The humidification mechanism of myAIRVO 2 delivers air or oxygen mixtures at high flow with the help of the Optiflow nasal cannula of tracheostomy interfaces.
AIRVO 2 Humidifier System - Flexible Temperature and Flow Settings
In myAirvo 2 there are 3 temperature settings. They are 37°C, 34°C, and 31°C designed to deliver the utmost compliance and comfort A wide flow range of 2 to 60 L/min is delivered through an integrated flow generator for a broad range of patients without requiring a wall air supply.
myAirvo 2 Humidifier - AirSpiral™ Heated Breathing Tube
- Designed with an advanced two-spiral to protect from condensation
- Dual purpose tube can be attached to both Optiflow and Optiflow Junior
- Added temperature probes or heater-wire adapters are not required Advanced two-spiral design to help protect against condensation
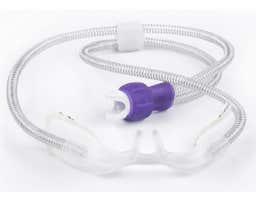
Airvo 2 Humidifier - Optiflow Nasal and Tracheostomy Interfaces
- Decreased formation of mobile condensation with the Evaqua technology
- Comfortable, adjustable prongs are curved to the patient’s nose
- Decreased gas jetting with the wide-bore design
myAIRVO 2 Humidifier System - Key Features
Variety of Fisher & Paykel Optiflow myAirvo 2 Interfaces
Optiflow nasal interfaces, as well as direct-connect tracheostomy and mask interfaces can be used with the myAIRVO 2 system.
Fisher & Paykel myAirvo 2 AirSpiral Heated Breathing Tube
Dual spiral heating wires and a temperature sensor are included. There are no additional temperature probes or heater-wire adapters needed.
Airvo 2 Has Adjustable Temperature and Flow Settings
Comfort and compliance may be achieved with three temperature settings (37, 34, and 31 °C). The integrated flow generator provides a wide variety of flow rates (2-60 L/min) for both adults and pediatric patients, with no need for a wall air supply.
myAirvo 2 is Designed for simple setup, use, and cleaning
Setup and troubleshooting are made easier using on-screen animations.
Airvo 2 is Controlled oxygen delivery (when required)
It is possible to add oxygen from a concentrator or cylinder. A built-in ultrasonic analyzer doesn't need to be calibrated, serviced, or replaced.
Requires a prescription to purchase.
Fisher & Paykel myAIRVO 2 - In the box:
- myAirvo2 humidifier
- AirSpiral Heated Tube
- Reusable water chamber
- Oxygen bleed-in adapter
- Filters
- User manual
User Guide
Setting Up myAIRVO 2 Humidifier System
1. BEFORE YOU BEGIN
Place the unit alongside your bed on a low shelf or on the floor. It must be level and below head height. Place the system such that the power supply's power cable is conveniently accessible and may be unplugged.
Fill the chamber with enough distilled water for the duration of usage, but never more than the 560 mL maximum water level line, using the included funnel.
To avoid burns:
- Do not use hot water in the water chamber.
- Always remove the water chamber to fill it, and always fill it with enough water to keep it from running dry, to avoid electric shock.
Fit the water chamber to the unit by pressing the finger guard down and sliding the chamber on, making sure that the blue chamber portends are aligned properly. Firmly press the chamber against the finger guard until it snaps into place. Continue to Step 3 below, "Install Heated Breathing Tube."
If Using The MR290 Auto-fill Water Chamber:
Pull the tab and remove the blue port covers from the chamber, then remove the bracket holding the water supply tube. Push the provided adapter entirely into the two vertical ports on the chamber, then clip the water supply tubing into place. Fit the MR290 chamber in the same way as the HC360 chamber.
Attach the water bag to the hanging bracket at least 20 cm (8”) above the unit and open the vent cap on the side of the bag. The chamber will now fill to the necessary level and stay there until the water bag is empty. Only use pure water, and make sure there is enough water in the water bag to keep it from running out.
Make sure that water is flowing into the chamber and that the water level is kept below the maximum water level line. Replace the chamber immediately if the water level climbs above the maximum water level line.
To avoid burns:
- Do not turn on the device unless the water chamber is in place, and do not touch the heater plate, water chamber, or chamber base while it is in operation.
- During usage, the water in the chamber heats up. When removing and emptying the chamber, use care.
To avoid electric shock:
- Avoid tilting the machine when handling it with the water chamber in place to prevent water from entering the unit enclosure.
- Before transferring the unit, remove all of the water from the water chamber.
To ensure optimal therapy (MR290 only):
- Do not use the auto-fill MR290 chamber if it has been dropped or left to dry, as this may cause the chamber to overfill.
- If the water level increases over the maximum water level line, do not use the MR290 chamber because water may enter the patient's airway.
Install Heated Breathing Tube
A blue plastic sleeve covers one end of the heated breathing tube. Slide the connection onto the unit by lifting the sleeve. To lock the sleeve, pull it down.
To avoid burns:
- Do not make any changes to the breathing tube or interface, and do not leave the breathing tube in direct contact with the skin for lengthy periods of time. The healthcare practitioner must evaluate the parameters for safe contact, including duration and skin condition.
- Do not provide heat to any component of the breathing tube or interface above ambient temperatures, such as by covering it with a blanket or heating it with infrared radiation, an overhead heater, or an incubator.
- Do not use an insulating sleeve or any other accessory that Fisher & Paykel Healthcare does not suggest.
Condensate Management
The unit must be placed level and below head height to allow condensate to drain away from the patient and into the water chamber. Disconnect the patient interface from the heated breathing tube, drain the condensate by elevating the patient end of the tube, and allow the condensate to stream into the water chamber. It may be essential to lower the goal flow rate to 30 L/min or less at higher target flow rates in order to guarantee that the condensate drains into the water chamber. If local sources of cooling, such as a fan to cool the patient or an air-conditioning unit/vent condensate, continue to act on the heated breathing tube, consider lowering the target temperature. Lowering the target temperature reduces the unit's humidity output, which reduces condensation.
Note: In addition, the temperature and humidity provided to the patient will be lowered.
SELECT PATIENT INTERFACE
The myAIRVO 2 is compatible with a wide range of patient interfaces. Read all of the cautions in the individual user instructions for the patient interface that will be utilized.
Adding chemicals other than water can have a negative impact on the humidifier and the treatment that is administered.

Fisher & Paykel myAIRVO 2 Humidifier System Parts


| Dimensions | 11.6x6.7x6.9 in |
| Weight | 4.8 lbs Unit only |
| Warranty |
2 Years |
|
Target Temperature Settings |
37, 34 and 31 celcius |
| Humidity performance |
>33 mg/L @ 37* C target >12 mg/L @ 34* C target >12 mg/L @ 31* C target
|
|
Maximum Temperature of Delivered Gas |
43* C |
|
Flow Range |
10 - 60 l/m Default 2 - 25 l/m Junior mode |
|
Voltage/Current |
100 - 115 v 2.2A (2.4 A max) 220 - 240 v 1.8A (2.0 A max) |
|
Supply Frequency |
50 - 60 Hz |